手册
- Unity 用户手册 2020.3 (LTS)
- New in Unity 2020 LTS
- 包
- 已验证包
- 2D Animation
- 2D Pixel Perfect
- 2D PSD Importer
- 2D SpriteShape
- Adaptive Performance
- Addressables
- Advertisement
- Alembic
- Analytics Library
- Android Logcat
- Animation Rigging
- AR Foundation
- ARCore XR Plugin
- ARKit Face Tracking
- ARKit XR Plugin
- Burst
- Cinemachine
- Code Coverage
- Core RP Library
- Editor Coroutines
- FBX Exporter
- High Definition RP
- In App Purchasing
- Input System
- iOS 14 广告支持
- JetBrains Rider 编辑器
- Magic Leap XR Plugin
- ML Agents
- Mobile Notifications
- Multiplayer HLAPI
- Oculus XR Plugin
- OpenXR 插件
- Polybrush
- Post Processing
- ProBuilder
- Profile Analyzer
- Quick Search
- Recorder
- Remote Config
- Scriptable Build Pipeline
- Shader Graph
- Test Framework
- TextMeshPro
- 时间轴
- Unity Distribution Portal
- Universal RP
- 版本控制
- Visual Effect Graph
- Visual Studio Code 编辑器
- Visual Studio 编辑器
- WebGL Publisher
- Windows XR Plugin
- Xiaomi SDK
- XR Plugin Management
- 预览包
- 核心包
- 内置包
- AI
- Android JNI
- 动画
- Asset Bundle
- Audio
- 布料
- Director
- Image Conversion
- IMGUI
- JSONSerialize
- Particle System
- 物理 (Physics)
- Physics 2D
- Screen Capture
- Terrain
- Terrain Physics
- Tilemap
- UI
- UIElements
- Umbra
- Unity Analytics
- Unity Web Request
- Unity Web Request Asset Bundle
- Unity Web Request Audio
- Unity Web Request Texture
- Unity Web Request WWW
- Vehicles
- Video
- VR
- Wind
- XR
- 按关键字排列的包
- Unity 的 Package Manager
- 创建自定义包
- 已验证包
- 在 Unity 中操作
- 安装 Unity
- 升级 Unity
- Unity 的界面
- 创建游戏玩法
- 编辑器功能
- 分析
- Asset Workflow
- 输入
- 2D
- 图形
- 渲染管线
- 摄像机
- 后期处理
- 光照
- 支持的模型文件格式
- 网格
- 纹理
- 着色器
- Shaders core concepts
- 内置着色器
- 标准着色器
- 标准粒子着色器
- Autodesk Interactive 着色器
- 旧版着色器
- 内置着色器的用途和性能
- 普通着色器系列
- 透明着色器系列
- 透明镂空着色器系列
- 自发光着色器系列
- 反光着色器系列
- 反射顶点光照 (Reflective Vertex-Lit)
- 反光漫射 (Reflective Diffuse)
- 反光镜面反射 (Reflective Specular)
- 反光凹凸漫射 (Reflective Bumped Diffuse)
- 反光凹凸镜面反射 (Reflective Bumped Specular)
- 反光视差漫射 (Reflective Parallax Diffuse)
- 反光视差镜面反射 (Reflective Parallax Specular)
- 反光法线贴图无光照 (Reflective Normal Mapped Unlit)
- 反光法线贴图顶点光照 (Reflective Normal mapped Vertex-lit)
- 使用 Shader Graph
- 编写着色器
- 编写着色器概述
- ShaderLab
- ShaderLab:定义 Shader 对象
- ShaderLab:定义子着色器
- ShaderLab:定义一个通道
- ShaderLab:添加着色器程序
- ShaderLab:命令
- ShaderLab:使用 Category 代码块对命令进行分组
- ShaderLab 命令:AlphaToMask
- ShaderLab 命令:Blend
- ShaderLab 命令:BlendOp
- ShaderLab 命令:ColorMask
- ShaderLab 命令:Conservative
- ShaderLab 命令:Cull
- ShaderLab 命令:Offset
- ShaderLab 命令:模板
- ShaderLab 命令:UsePass
- ShaderLab 命令:GrabPass
- ShaderLab 命令:ZClip
- ShaderLab 命令:ZTest
- ShaderLab 命令:ZWrite
- ShaderLab 旧版功能
- Unity 中的 HLSL
- Unity 中的 GLSL
- Example shaders
- 编写表面着色器
- 为不同的图形 API 编写着色器
- 着色器性能和性能分析
- 材质
- 粒子系统
- 选择粒子系统解决方案
- 内置粒子系统
- 使用内置粒子系统
- 粒子系统顶点流和标准着色器支持
- 粒子系统 GPU 实例化
- 粒子系统 C# 作业系统集成
- 组件和模块
- 粒子系统 (Particle System)
- 粒子系统模块
- 粒子系统 (Particle System) 主模块
- Emission 模块
- Shape 模块
- Velocity over Lifetime 模块
- Noise 模块
- Limit Velocity Over Lifetime 模块
- Inherit Velocity 模块
- Lifetime by Emitter Speed
- Force Over Lifetime 模块
- Color Over Lifetime 模块
- Color By Speed 模块
- Size over Lifetime 模块
- Size by Speed 模块
- Rotation Over Lifetime 模块
- Rotation By Speed 模块
- External Forces 模块
- Collision 模块
- Triggers 模块
- Sub Emitters 模块
- Texture Sheet Animation 模块
- Lights 模块
- Trails 模块
- Custom Data 模块
- Renderer 模块
- 粒子系统力场 (Particle System Force Field)
- 内置粒子系统示例
- Visual Effect Graph
- 创建环境
- 天空
- 视觉效果组件
- 高级渲染功能
- 优化图形性能
- Color
- 物理系统
- 脚本
- 多玩家和联网
- 音频
- 视频概述
- 动画
- 创建用户界面 (UI)
- 导航和寻路
- Unity 服务
- Setting up your project for Unity services
- Unity Organizations
- Unity Ads
- Unity Analytics
- Unity Cloud Build
- Automated Build Generation
- 支持的平台
- 支持的 Unity 版本
- 共享链接
- 版本控制系统
- 使用 Unity 开发者控制面板 (Developer Dashboard) 对 Unity Cloud Build 进行 Git 配置
- 使用 Unity 开发者控制面板 (Developer Dashboard) 对 Unity Cloud Build 进行 Mercurial 配置
- 将 Apache Subversion (SVN) 用于 Unity Cloud Build
- 使用 Unity 开发者控制面板 (Developer Dashboard) 对 Unity Cloud Build 进行 Perforce 配置
- 使用 Unity 开发者控制面板 (Developer Dashboard) 对 Unity Cloud Build 进行 Plastic 配置
- 发布到 iOS
- 高级选项
- 在 Unity Cloud Build 中使用可寻址资源
- 编译清单
- 计划构建
- Cloud Build REST API
- Unity Cloud Content Delivery
- Unity IAP
- Setting up Unity IAP
- 跨平台指南
- 应用商店指南
- 实现应用商店
- Unity Collaborate
- Setting up Unity Collaborate
- Adding team members to your Unity project
- 查看历史记录
- Enabling Cloud Build with Collaborate
- 管理 Unity Editor 版本
- Reverting files
- Resolving file conflicts
- 排除资源使其不发布到 Collaborate
- 将单个文件发布到 Collaborate
- 还原项目至以前的版本
- 进行中 (In-Progress) 编辑通知
- 管理云存储
- 将项目移动到另一个版本控制系统
- Unity Accelerator
- Collaborate troubleshooting tips
- Unity Cloud Diagnostics
- Unity Integrations
- Multiplayer 服务
- Unity 分发平台
- XR
- 开源代码仓库
- Unity Asset Store
- 平台开发
- 将“Unity 用作库”用于其他应用程序
- 启用深层链接
- 独立平台
- macOS
- Apple TV
- WebGL
- iOS
- Android
- Windows
- 将 Unity 集成到 Windows 和 UWP 应用程序中
- Windows 通用
- 通用 Windows 平台
- 已知问题
- 旧版主题
- 术语表
创建瓦片
可使用两种方法在 Unity 中创建瓦片 (Tile) 资源;第一种方法是从 Assets 菜单直接创建瓦片资源。第二种方法是从一组精灵自动生成瓦片资源。
为瓦片资源导入和准备精灵
通过将纹理放入 Assets 文件夹,即可将瓦片地图的各个瓦片或瓦片集导入 Unity 项目。选择导入的图像可以在 Inspector 窗口中查看其纹理导入器 (Texture Importer) 设置。
![]()
精灵导入设置。
导入精灵供瓦片地图中使用时,请使用以下建议设置。有关每项设置的更多信息,请参阅 Texture Type: Sprite (2D and UI) 文档。
1.Texture Type - 将此项设置为 Sprite (2D and UI)。瓦片地图不支持其他纹理类型。
2.Sprite Mode - 如果纹理只包含一个精灵,将此项设置为 Single。如果纹理包含多个元素,例如包含多个瓦片纹理的瓦片集,则设置为 Multiple。
![]()
在导入精灵图集时将 Sprite Mode 设置为 Multiple。
3. Pixels Per Unit (PPU) - This value is the number of pixels that make up one Unity unit for the selected Sprite. This determines the size of the Tile Sprite when it is rendered on the Tilemap. It is recommended to set this value to the width(in pixels) of a single Tile Sprite so that a Tile is equal to one Unity unit in width. For both Hexagonal and Isometric Tiles, measure the width of the Sprites at their widest. The size of the Tile Sprites are also affected by the Cell Size property of the Grid parent of the Tilemap also affects the size of Tile Sprites as the Cell Size determines how many Unity units equal to a single Cell.
In the example below, the imported Sprites are 64x64. The default Tilemap has a Cell Size of (XYZ: 1, 1, 0) Unity units. To make a Tile Sprite fit exactly on a single Cell of the Tilemap, set its PPU value to 64 to match its pixel width. The Sprite’s entire width then corresponds to one Unity unit, which is equal to the width (X value: 1) of a single Cell on the Tilemap.

Left: Sprites set to 64 PPU. Middle: Same Sprites set to 128 PPU. Right: Sprites set to 32 PPU.
By doubling the original PPU value of 64 to 128, the Sprite scales to 0.5(64px/128) Unity units in width. Halving the PPU value to 32 instead scales the Sprites to 2(64px/32) Unity units in width. The Sprites appear smaller or bigger respectively, however their Cell position on the Tilemap remains unchanged.
4.Sprite Editor Outlines - 导入精灵后,通过打开每个精灵的 Sprite Editor 并编辑它们的轮廓即可优化轮廓。如果在将 Sprite Mode 设置为 Multiple 的条件下导入纹理并且纹理包含多个精灵,则应在 Sprite Editor 中编辑每个精灵的轮廓。
在瓦片面板中自动生成瓦片资源
通过将瓦片的单个精灵或精灵图集直接放入Tile Palette 窗口(如果该窗口未打开,请转到 Window > 2D > Tile Palette),可自动生成瓦片。
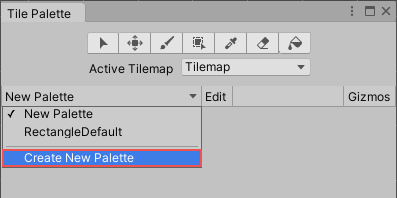
首先,准备并导入瓦片精灵,然后在 Tile Palette 窗口中打开 ‘New Palette’ 下拉选单。从列表中选择一个现有的瓦片面板,或选择 ‘Create New Palette’ 打开 Create New Palette 对话框。

New Palette 下拉选单。
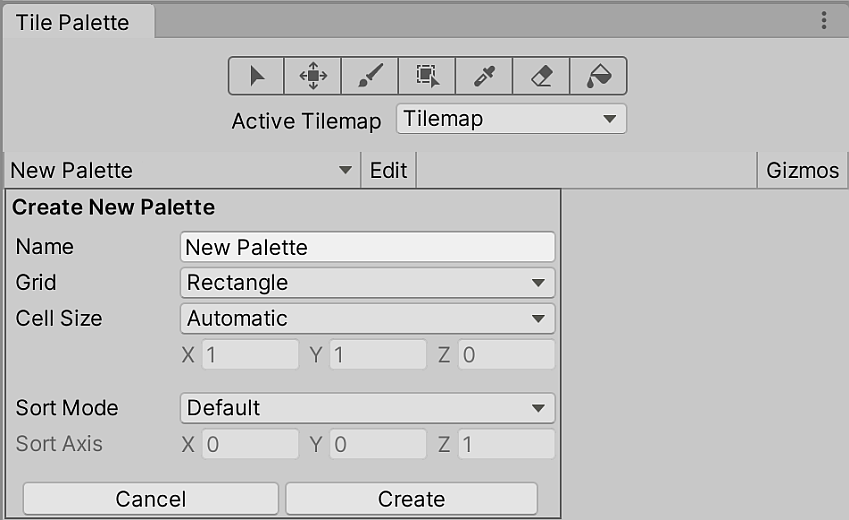
选择瓦片面板的属性后(有关不同选项的更多信息,请参阅瓦片面板文档),请选择 Create 在窗口中打开新的面板。

选择 ‘Create’ 创建一个新的瓦片面板。
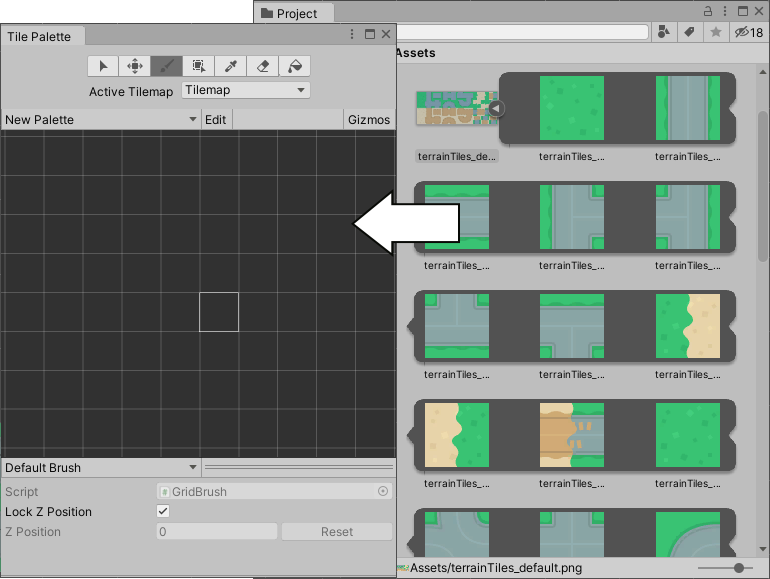
创建或加载瓦片面板后,请将 Assets 文件夹中的纹理或精灵直接拖放到 Tile Palette 窗口中。系统将提示输入新瓦片资源的保存位置。选择保存位置,新的瓦片资源就会在选择的文件夹中生成。生成的瓦片也会自动放置在瓦片面板上。

瓦片资源来源:Kenney
删除瓦片资源
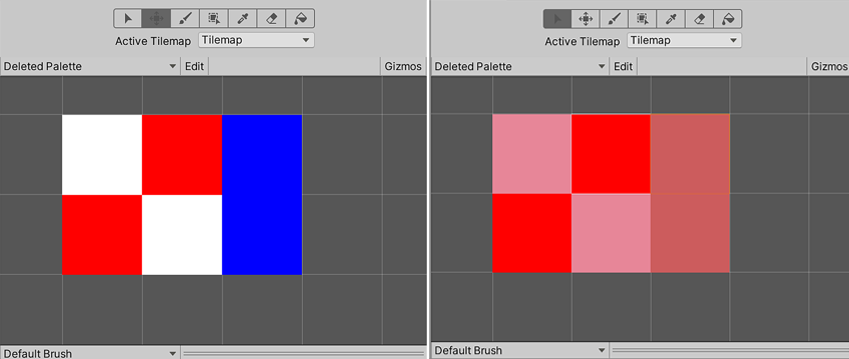
当您删除瓦片资源时,它们将被替换为占位瓦片(由带有各种粉红色阴影的白色方块组成)。占位瓦片放置在已删除瓦片资源的原始位置的瓦片地图上。这有助于识别在项目中有意或无意删除的瓦片资源。
每个删除的瓦片资源都有一个对应的占位瓦片,带有独特的粉红色阴影,可将占位瓦片彼此区分开来。您可以通过使用灌填工具将这些占位瓦片替换为另一个瓦片,或者或删除它们。

左:具有三种不同颜色瓦片资源的瓦片面板(以它们各自的颜色命名 - White、Red 和 Blue)。右:删除白色和蓝色瓦片资源后的瓦片面板。红色瓦片资源尚未删除。
占位瓦片替换已删除瓦片资源添加于 2020.2 NewIn20202 页面内容和屏幕截图更新于 2020.1 NewIn20201 * 在 2017.2 版中添加了瓦片地图 NewIn20172